Following the release of Samsung’s second flagship device Galaxy S II, Galaxy S II Sky Rocket came out in October, 2011 under the title of At&t. Basically the Galaxy S II for At&t is called this Sky Rocket variant. A little changed and better than the original Galaxy S II, Galaxy S II Sky Rocket sports a 4.5 inch Super AMOLED display with 207 ppi and Samsung’s own TouchWiz UI atop. Galaxy S II Sky Rocket is powered up with Qualcomm’s Snapdragon Dual Core Scorpion Chipset clocked at 1.5 GHz, and a RAM of 1 GB under the hood. The battery is ranged at 1859 mAh, that’s a little better than the original Galaxy S II.
Well, Let’s get back to the topic, Galaxy S II Sky Rocket is much popular with the users. You may be owning one and looking out for a method to root your device and install a custom recovery either TWRP or CWM. To make it easier for you, I’ve compiled up the root and custom recovery method in the following post in simple and easy words. You just got to follow this guide to the letter, but before we move further, let’s first have a brief intro about the root access and custom recovery in case you don’t know it yet.
Rooting your phone gives you complete access over all the data which is apparently locked by the manufacturers. This includes removal of the factory restrictions and making changes to the internal system and the operating system. Gaining the root access gives you the privileges to install various applications to enhance the performance of your device, allows you to remove the built-in applications/programs, helps you to upgrade the battery life of your device & install the apps which require the root access for the proper functionality and modify your device in so many other ways e.g using mods and custom roms. By installing the custom recovery, you can flash custom ROMs in the phone easily. Custom recovery also lets you backup your current ROM and restore it in case of any mishap. There is a laundry list of things you can do after having your device rooted and installed the custom recovery, now once you’re rooted and have installed the custom recovery, go ahead and enjoy it on your phone. Here’s our collection of 10 Best Root Apps.
Let’s move forward….
|
Before we go ahead, here are some pre-requisites that you need to follow:
-
-
- This guide is only for Galaxy S II Sky Rocket SGH I727 for At&t and SGH I727R for Rogers. Do not try this on any other device. Check your device’s model first under settings>about the device.
- Make sure that your phone’s battery is charged over at least 60%. This is highly recommended in order to prevent any power issues on the device during the flashing process.
- Make sure that you have backed up all your important Contacts, Call Logs & Messages. It is highly recommended in case of any mishap or data loss to backup all your important data.
- Make sure that you use the original data cable to connect your device to your PC.
- In the case of USB connection problems, enable USB debugging mode on your device. To do so, openSettings>General>Developer Options.
-
***Post updated with latest recovery links***
How to install TWRP / Philz Advanced CWM Recovery on Samsung Galaxy S II SkyRocket:
-
-
- Download CWM or TWRP recovery according to your choice.
- Download TWRP Recovery for Galaxy S II SkyRocket: Latest TWRP 2.8.7.0 Link 1| Mirror
- Download CWM Recovery for Galaxy S II SkyRocket: Link 1| Mirror
- The downloaded file should be in .tar.md5 format.
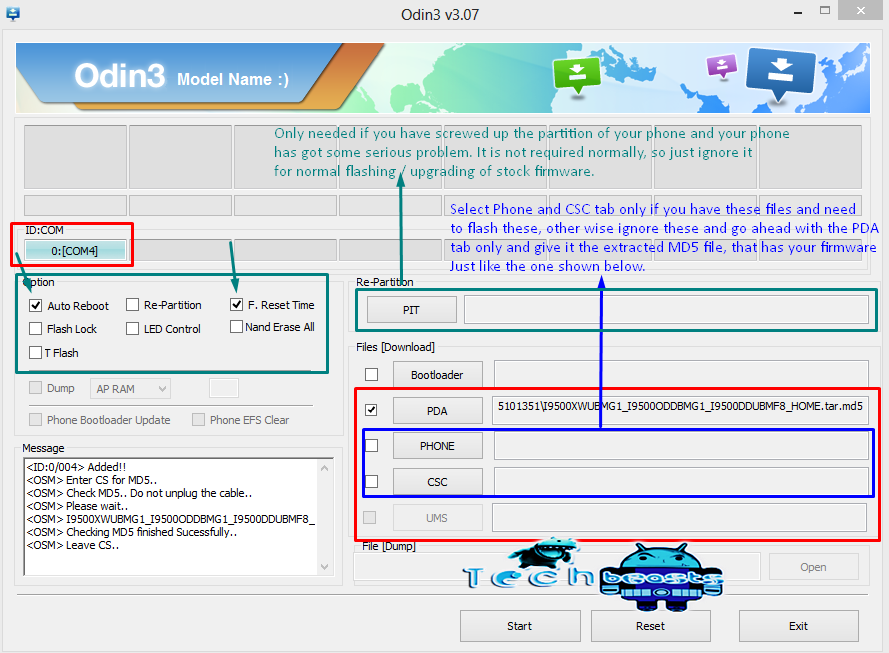
- Open Odin.
- Put your phone in download mode. To do so, turn off your device completely, now turn it on by pressing and holding Volume Down + Home Button + Power Key. You should see a warning now, press Volume Up to continue.
- Connect your phone to your PC now, the ID:COM box should turn blue now.
- Select the PDA tab in Odin3 and select the downloaded TWRP / Philz Advanced CWM recovery.tar.md5 file.
- Hit the Start button now. It will flash the TWRP/Philz Advanced CWM recovery quickly, as soon as your phone reboots disconnect it from your PC.
- Congrats! You’ve successfully installed TWRP/Philz Advanced CWM recovery on your phone. You can access it now by pressing Volume Up + Home button + Power Key.
- Download CWM or TWRP recovery according to your choice.
-
How to Root Samsung Galaxy S II Sky Rocket:
-
-
- Download SuperSu from HERE.
- Place the downloaded.zip file on your phone’s SD card.
- Boot into TWRP/CWM recovery. To do so, turn off your device completely first. Now turn it on by pressing and holding Volume Up + Home Button + Power Key.
- Select “Install>Select the downloaded SuperSu.zip File” or “Install>Choose Zip From SD/Ext SD card>SuperSu.zip”.
- Proceed the installation. It will flash SuperSu.zip quickly in your phone now.
- As soon as the installation is finished, reboot your device and find SupeSu in the App Drawer.
- Congrats! You’ve successfully rooted your Galaxy S II Sky Rocket. You can now install Busy Box from the Google Play Store.
-
That’s all. We hope the guide works perfectly for you. In case you got any queries, or face any difficulties or got any suggestions, feel free to stop by the comment box below. We will respond at our best.


I’ve downloaded odin3.12.3 and nowhere i look can i find PDA. my list says (BL, AP, CP, CSC) and the program says (New Model: Download BL+AP+CP+CSC). I’ve been trying to follow these steps you have but it feels like I’m jumping through hoops which should otherwise be a simple straight forward procedure.