

Updating to this latest Android version will wipe off root access from your device, or if you haven’t rooted yet, you may want to root it after updating to Android Lollipop. In the following post we are going to show you how you can install TWRP recovery and root your Galaxy Note Pro 12.2 SM-P900 (WiFi), SM-901 (3G), SM-P905 (LTE) running Android 5.0.2 Lollipop. Let’s go ahead without any further ado now.
Precautions:
- This guide is only for the devices mentioned above. Do not try this on any other device.
- Your device must be running Android 5.0 Lollipop or higher.
- Backup important contacts, call logs, sms messages and media content as a safety measure.
- Charge your Galaxy Note Pro up to 50% to avoid power issues during flashing process.
- While using Odin, turn off Samsung Kies, Firewall and any Antivirus software if you’ve enabled.
- Follow this guide to the letter.
How To Root Android Lollipop & Install TWRP On Galaxy Note Pro 12.2
Required downloads:
- Download and install Samsung USB drivers
- Download and extract Odin.
- Download TWRP recovery.img.tar file according to your device
- Download SuperSu.zip file and copy it to your phone.
How To Install TWRP & Root Now:
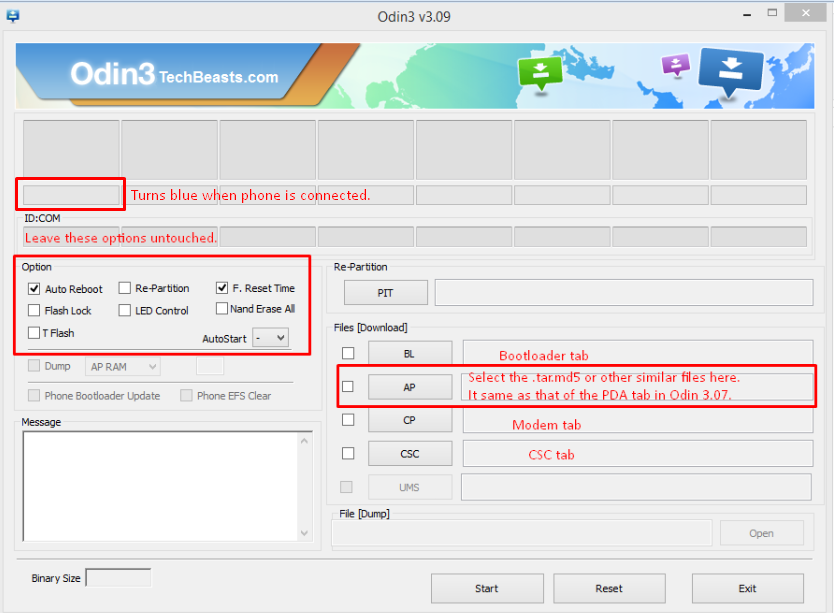
Step#1: Open Odin.exe from the folder you extracted.
Step#2: Click on “PDA” / “AP” tab and select the downloaded TWRP Recovery.img.tar file.
Step#3: Do not touch any other option in Odin. The only options ticked should be F.Reset Time and Auto-Reboot. Leave all other options as it is.
Step#4: Now put your Galaxy Note Pro in download mode and connect it to your PC. To put it in download mode, turn it off completely. Now turn it on by press and holding Volume Down + Home + Power Key. It will boot up with a warning. Press Volume Up to continue. You should be in download mode now. If this combination doesn’t work, here’s How to Boot Samsung Galaxy Devices into Download & Recovery Mode
Step#5: Now connect it with your PC and let Odin detect it. As soon as Odin detects your phone, it will show you a blue or yellow indicator in the ID:COM box.
Step#6: As your device has been connected, click the “Start” button now.
Step#7: Odin will now flash TWRP. Once done, it will reboot your device.
Step#8: Disconnect your device from your PC and turn it off completely.
Step#9: Now we are going to boot it into TWRP recovery mode. To do so, turn it on by pressing and holding Volume Up + Home + Power Key. If this method doesn’t work, try one from the guide linked above.
Step#10: As your device boots up in to recovery mode, tap “Install > locate the copied SuperSu.zip > select it and swipe finger to flash it.”.
Step#11: Let it flash SuperSu.zip, once done, reboot your device. Check SuperSu in app drawer now.
Step#12: Verify root access using Root Checker application.
That’s all. Your device should be rooted running Android Lollipop.
Got any problems? Reach us out through the comment box below.


I tried this, everything worked flawlessly with Oden and then when I try rebooting into recovery I get “recovery is not seandroid enforcing”. It boots standard recovery not twrp. Any ideas? Anyone else get this to work successfully?
@michaellumb:disqus Is your phone rooted now? and are you able to boot into the system of your phone? If no then recover it by flashing a stock firmware using Odin, I’m looking for this issue, I’ll update soon.
Thank you for checking. Yes it is. I found elsewhere that when you flash twrp via odin you need to uncheck auto-reboot. Then go directly from the odin flash and force a reboot into recovery (Power, Vol up, Home). Doing this worked perfect.
I’ve followed all the steps as well… I’m trying to root Samsung Galaxy Note Pro 12.2 Wifi Tablet after the damn over the air update to 5.0.2 lollipop… Odin3 v3.10 sees the tablet, installs TWRP with PASS!, then when I go to restart into TWRP, however instead I get this Android dropping dead with an exclamation point sticking out of his chest, then it enters into Android System Recovery <3e> LRX22G.P900UE1C0F4 with various options, but no TWRP… Any suggestions?
@disqus_2VBhO0QtTA:disqus Flash the recovery once again, but this time untick the auto-reboot option in Odin. Once recovery is flashed, disconnect your device and go into recovery mode straight away by pressing and holding Volume Up + Power keys. TWRP will stick and work this way. Good Luck.
how do you know which version of odin to use
@disqus_F97waLRd76:disqus use the version of Odin which we have linked above. Using latest version is always recommended.
Will this work with 5.0.2 lollipop version
@disqus_NNzzI6Cu1O:disqus yes it will work. Best of luck 🙂
VERY GOOD MY FRIEND,TANKS
Will this work with the note pro 907a from atA&t ?
Hi, there
Could U pls tell me Y this error is appearred?
http://s6.uplod.ir/i/00727/106creghwrnn.png
I did everything right.
it stuck on this step and the start button never appearred
tnx
+
Is the twrp-2.8.7.0-v1a3gxx.img.tar.md5 file really 1KB?!
(I tried to download it several times)
@pop_poo:disqus no it’s not a 1KB file, that’s why you’re getting this error.
Hi, there
Could U pls tell me Y this error is appearred?
I did everything right.
it stuck on this step and the start button never appearred
tnx
@pop_poo:disqus you need to download the file properly. The files linked above are of 11, 8.6 and 9 MB. Please download it properly.
Yes, you’re right
I removed .md5 from end of the download link, and it worked well
But something wrong in recovery mode
How i install supersu? i can’t find “install” as U said in recovery mode!
tnx
@pop_poo:disqus you’ve to download the supersu file and copy it to your phone in order to make it appear in recovery
Where does the supersu.zip need to be copied to? It’s currently in my Downloads folder on my tablet and there is no Install option just as you see in the other user’s screenshot above. I believe there is a step missing on how to install Supersu.
I had the same problem. When done correctly, you can choose the file from internal or sd card. Uncheck “Auto Reboot” on Odin. After you hit start, wait till you get PASS. Mine took about 2 minutes. Disconnect from PC. Force restart into recovery mode by holding volume up, power, and home until the screen goes blank and you see the Samsung logo. Follow directions from there. Thank you.
Brilliant. Thank you. Yours is the only advice that worked for me.
As U see, there’s not “install” ! So how i have to install the BETA-SuperSU-v2.49.zip file from device storage?
Hi, Usama M
Do U know what was my fault?
My tablat had been rooted since 4.4.2
and upgrading to 5.0.2, didn’t reset it. So your way to root didn’t work at all
So I first reset it today(factory reset), then flash it with original 5.0.2 rom, and then root it with twrp, and finally it worked!
tnx
@pop_poo:disqus
if you upgraded to stock 5.0.2, it must have wiped the root access. At first it’s not possible that it didn’t reset root. It won’t reset root only if you flashed a pre-rooted 5.0.2.
If your phone was already rooted, then trying to root over a root won’t work.
The only way to root the phone is to have an un-rooted device and then root it.
Factory reset can’t wipe the root access either.
Can you please tel
l me if you followed the instructions listed above to root in the end?
I was thinking like U , but definitely the old root had made some troubles
(Though the old root access had been removed but still made some unknown trouble)
As i said, after the new fresh flash, i could root it at the end.
I did everything correct but stuck in step#10
The recovery page doesn’t have any choice to Install
It has only” wipes and updates and …”
@disqus_aVOPoBsRhs:disqus that means the recovery wasn’t installed. Untick the auto-reboot option in odin and flash the recovery again, once done, reboot the device directly into recovery mode without rebooting into system. Let me know if it helps or not.
What about SM-P907A?