Sometimes users complain that they are having problems with the host connection, that they are experiencing some errors in host connection while using Google Chrom or any other browser. The reason is quite simple, it is time for you to flush the DSN cache of your Browser, Domain Name System is just a small databank that stores all the IP addresses of any website you visit or access. The main purpose of this databank is to let you access that IP easily, when the serves changes or they create new servers. When the IP address changes and they change the server, you, sometimes, experience the DNS error. The reason of this error is that you might have accessed that site a lot more times and the Previous IP is saved in the Cache and it is not saving the new one. In such cases, Clearing the DNS Cache comes in handy.
The Process is quite simple and can be done through any of the Browser, whether it is Chrome or Firefox. You can even solve this problem using the command prompt window in Windows 7 or 8, some codes can be run and you’ll get a brand new DNS cache to save new IPs of old or new sites. To Flush the DNS cache, Follow the steps below:
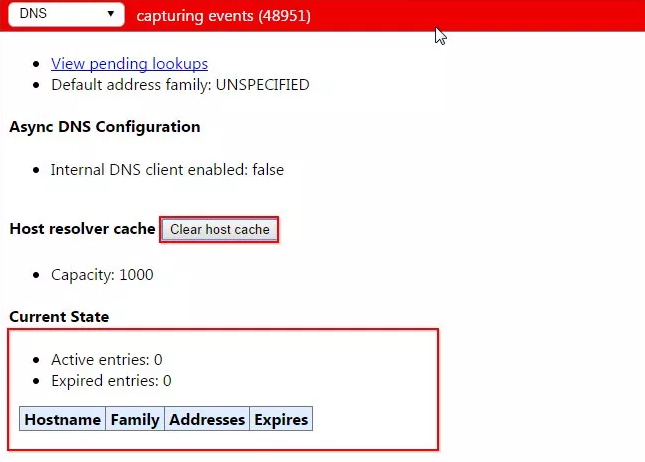
Step 1: Open Google Chrome and Type chrome://net-internals/#dns.
Step 2: Now look for active entries, that means your Browser has saved the number of Active entries in Cache.
Step 3: Now look for the button saying, Clear hot cache. Click it more than once to make sure that it works.
Step 4: Now Navigate to chrome://net-internals/#sockets or Click the DNS and select Sockets.
Step 5: Now Click the both Options, first “Close Idle Sockets”, then “Flush Socket Pools”
Flush DNS with Command Prompt in Windows:
Step 1: Click Start and type cmd in search bar and run it as admin,
Step 2: Now Type ipconfig/flushdns and press Enter to flush the DNS cache
Step 3: Now Type ipconfig/displaydsn to see whether the DNS has been flushed or not
Step 4: If you receive the message saying “Could Not Display the DNS Resolve Cache”, then that means you are successful.


